Flume对接Kafka
2021-03-04 08:28
标签:demo java buffer epo type 启用 采集 tail container 需求:根据 需求分析 1)flume的配置文件 在hadoop102上创建flume的配置文件 2)启动 3)创建 4)启动 5)启动 6)观察 需求: ? 将日志数据中带有的 ? 将日志数据中带有 ? 其他的数据输入到kafka的 需求分析 通过自定义 1)自定义 创建工程,pom依赖 自定义拦截器类,并打包上传至/opt/module/flume/lib包下 2)编写 ? flume-netstat-kafka.conf 3)在kafka中创建 4)启动3个 5)启动 6)观察消费者的消费情况 Flume对接Kafka 标签:demo java buffer epo type 启用 采集 tail container 原文地址:https://www.cnblogs.com/wh984763176/p/13264086.html
一.简单实现
flume 监控 exec 文件的追加数据,写入 kafka 的 test-demo 分区,然后启用 kafka-consumer 消费 test-demo 分区数据。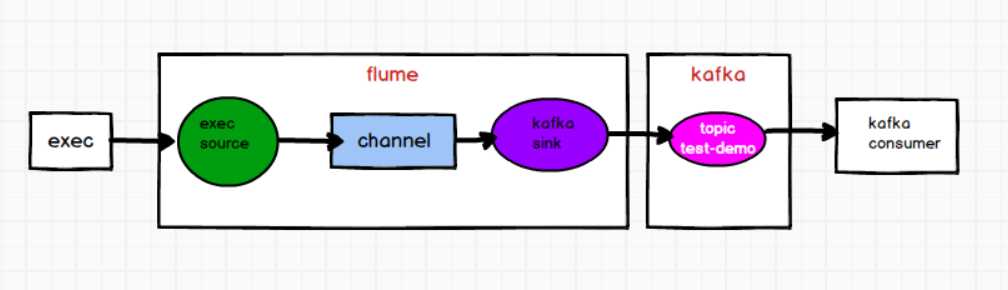
# define
a1.sources = r1
a1.sinks = k1
a1.channels = c1

# source
a1.sources.r1.type = exec
a1.sources.r1.command = tail -F  /opt/module/testdata/3.txt

# sink
a1.sinks.k1.type = org.apache.flume.sink.kafka.KafkaSink
#kafka的broker主机和端口
a1.sinks.k1.kafka.bootstrap.servers = hadoop102:9092,hadoop103:9092,hadoop104:9092
#kafka sink发送数据的topic
a1.sinks.k1.kafka.topic = test-demo
a1.sinks.k1.kafka.flumeBatchSize = 20
a1.sinks.k1.kafka.producer.acks = 1
a1.sinks.k1.kafka.producer.linger.ms = 1

# channel
a1.channels.c1.type = memory
a1.channels.c1.capacity = 1000
a1.channels.c1.transactionCapacity = 100

# bind
a1.sources.r1.channels = c1
a1.sinks.k1.channel = c1
zk、kafka集群test-demo 主题 bin/kafka-topics.sh --create --bootstrap-server hadoop102:9092 --topic test-demo --partitions 2 --replication-factor 2
kafka consumer 去消费 test-demo 主题 bin/kafka-console-consumer.sh --bootstrap-server hadoop102:9092 --topic test-demo
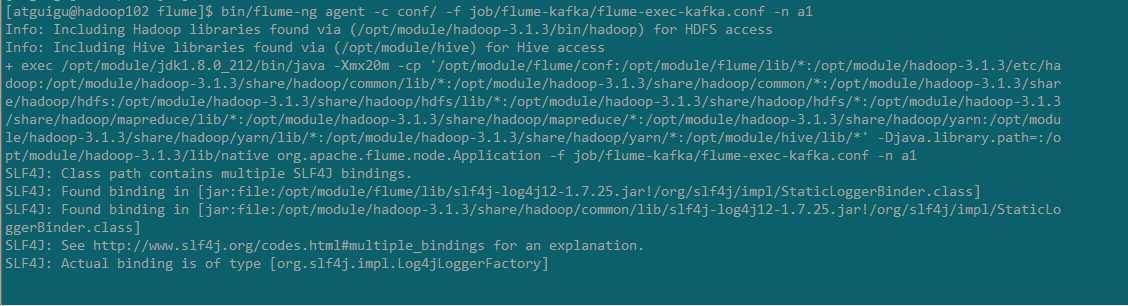
flume,并且往 3.txt 中追加数据 bin/flume-ng agent -c conf/ -f job/flume-kafka/flume-exec-kafka.conf -n a1
echo hello >> /opt/module/testdata/3.txt
kafka consumer 的消费情况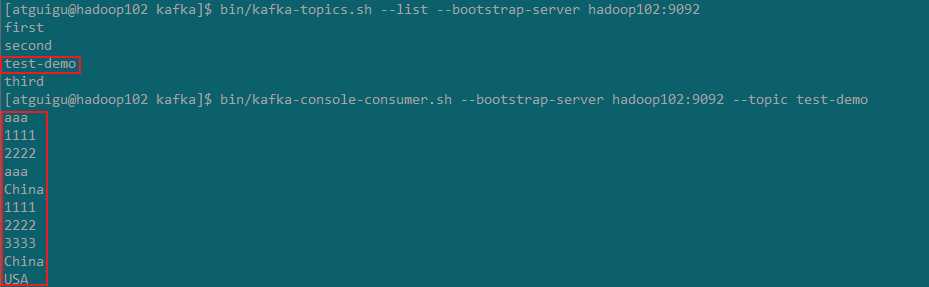
二.自定义intercepor实现数据分离
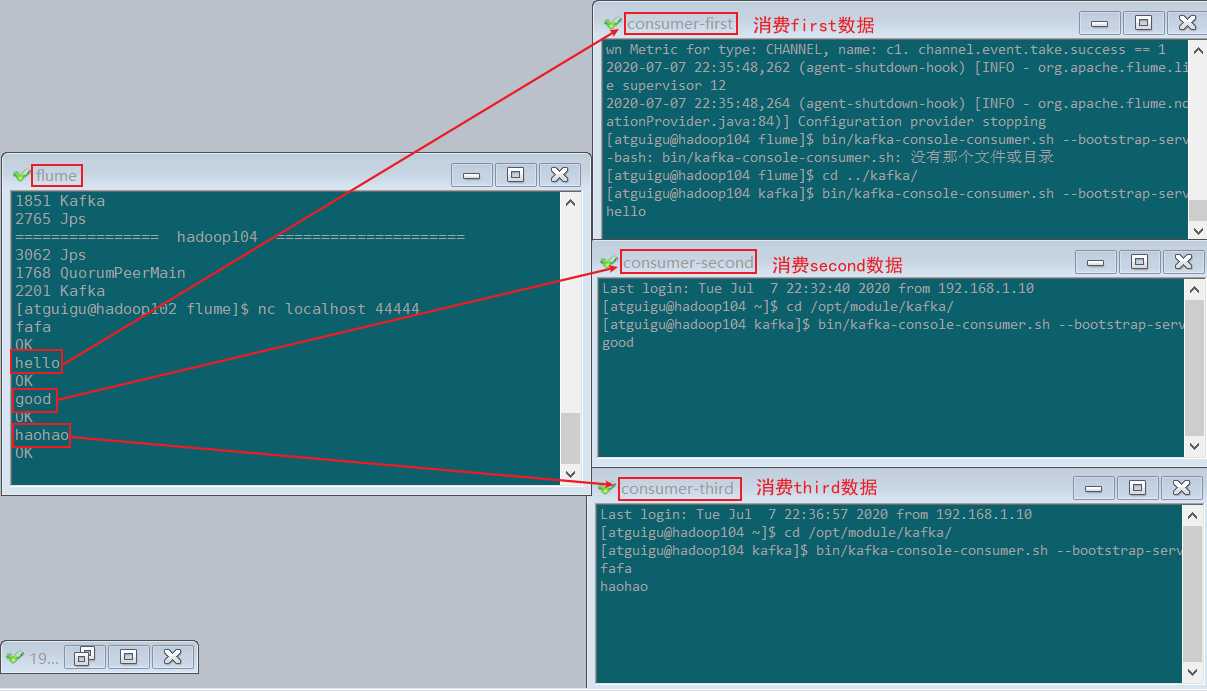
flume监控 exec 文件的追加数据,将flume采集的数据按照不同的类型输入到不同的topic中hello 的,输入到kafka的 first 主题中,good 的,输入到kafka的 second 主题中,third 主题中flume 的拦截器,往 header 增加 topic 信息 ,配置文件中 kafka sink 增加 topic 配置,实现将数据按照指定 topic 发送。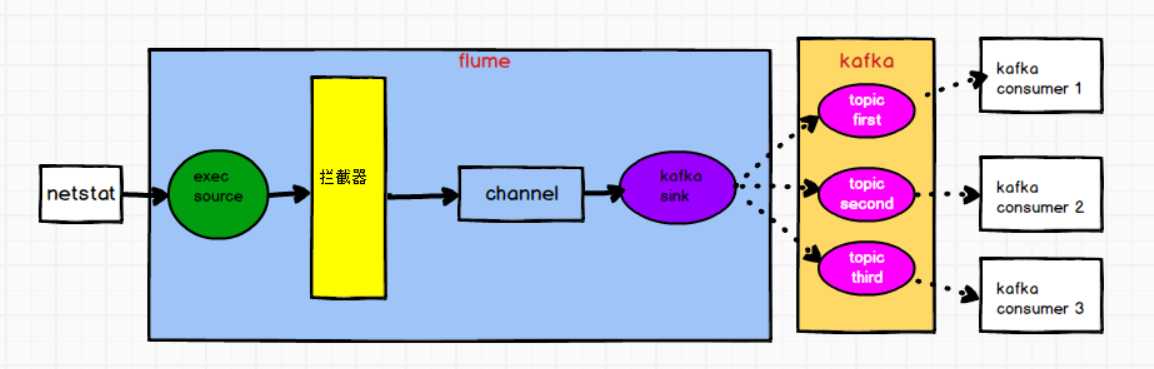
flume 拦截器 package com.bigdata.intercepter;
import org.apache.flume.Context;
import org.apache.flume.Event;
import org.apache.flume.interceptor.Interceptor;
import java.util.ArrayList;
import java.util.List;
import java.util.Map;
/**
* @description: TODO 自定义flume拦截器
* @author: HaoWu
* @create: 2020/7/7 20:32
*/
public class FlumeKafkaInterceptorDemo implements Interceptor {
private Listflume 的配置文件# Name the components on this agent
a1.sources = r1
a1.sinks = k1
a1.channels = c1
# Describe/configure the source
a1.sources.r1.type = netcat
a1.sources.r1.bind = localhost
a1.sources.r1.port = 44444
#Interceptor
a1.sources.r1.interceptors = i1
#自定义拦截器全类名+$Builder
a1.sources.r1.interceptors.i1.type = com.bigdata.intercepter.FlumeKafkaInterceptorDemo$Builder
# Describe the sink
a1.sinks.k1.type = org.apache.flume.sink.kafka.KafkaSink
#默认发往的topic
a1.sinks.k1.kafka.topic = third
a1.sinks.k1.kafka.bootstrap.servers = hadoop102:9092,hadoop103:9092,hadoop104:9092
a1.sinks.k1.kafka.flumeBatchSize = 20
a1.sinks.k1.kafka.producer.acks = 1
a1.sinks.k1.kafka.producer.linger.ms = 1
# # Use a channel which buffers events in memory
a1.channels.c1.type = memory
a1.channels.c1.capacity = 1000
a1.channels.c1.transactionCapacity = 100
# Bind the source and sink to the channel
a1.sources.r1.channels = c1
a1.sinks.k1.channel = c1
first , second , third 这3个topic[hadoop@hadoop102 kafka]$ bin/kafka-topics.sh --list --bootstrap-server hadoop102:9092
__consumer_offsets
first
second
test-demo
third
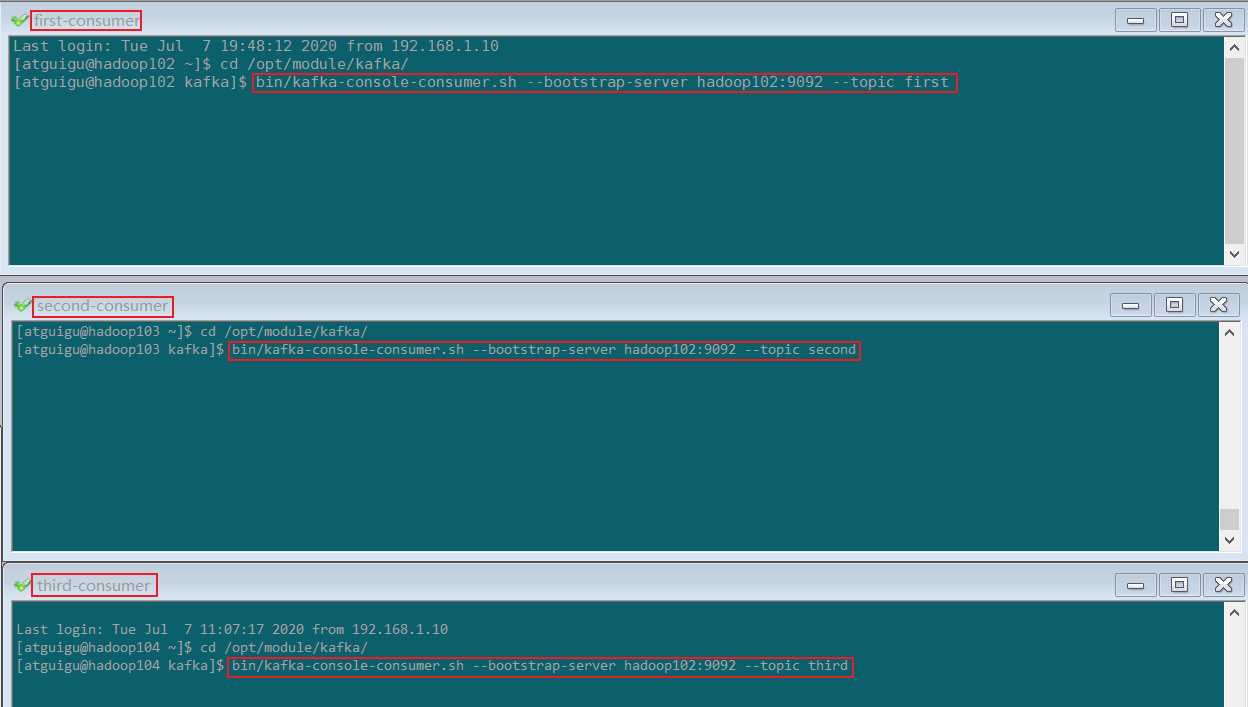
kafka consumer 分别消费 first , second , third 中的数据bin/kafka-console-consumer.sh --bootstrap-server hadoop102:9092 --topic first
bin/kafka-console-consumer.sh --bootstrap-server hadoop102:9092 --topic second
bin/kafka-console-consumer.sh --bootstrap-server hadoop102:9092 --topic third
flume,通过netstat发送数据到flumebin/flume-ng agent -c conf/ -f job/flume-kafka/flume-netstat-kafka.conf -n a1
nc localhost 44444
下一篇:JS中的基本类型和引用类型