Kubernetes(k8s)常用资源的使用、Pod的常用操作
2021-02-02 05:17
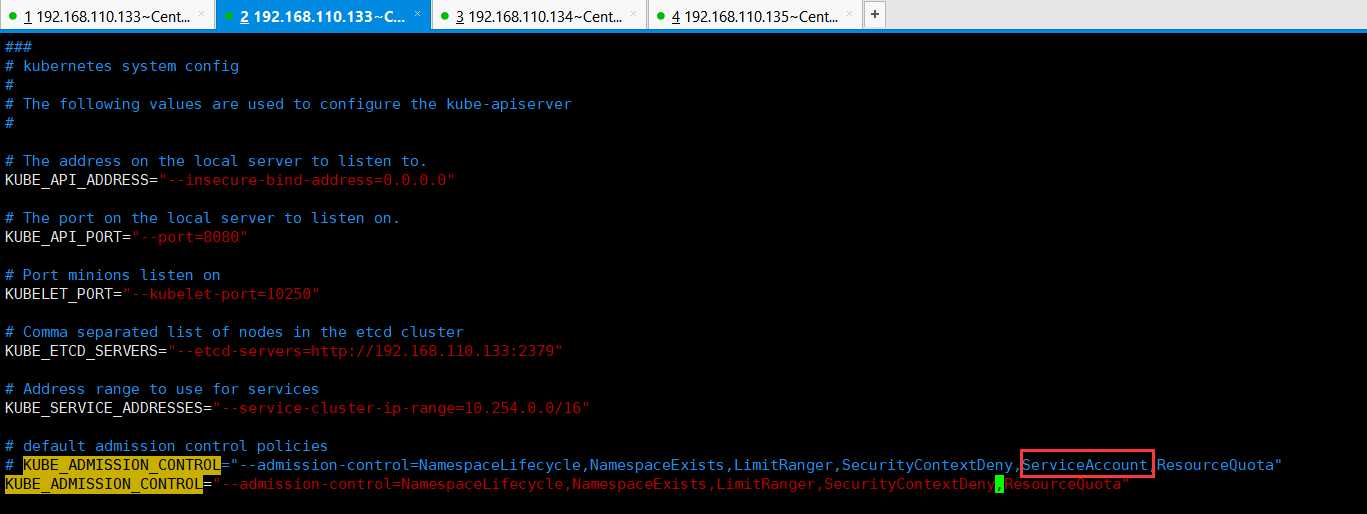
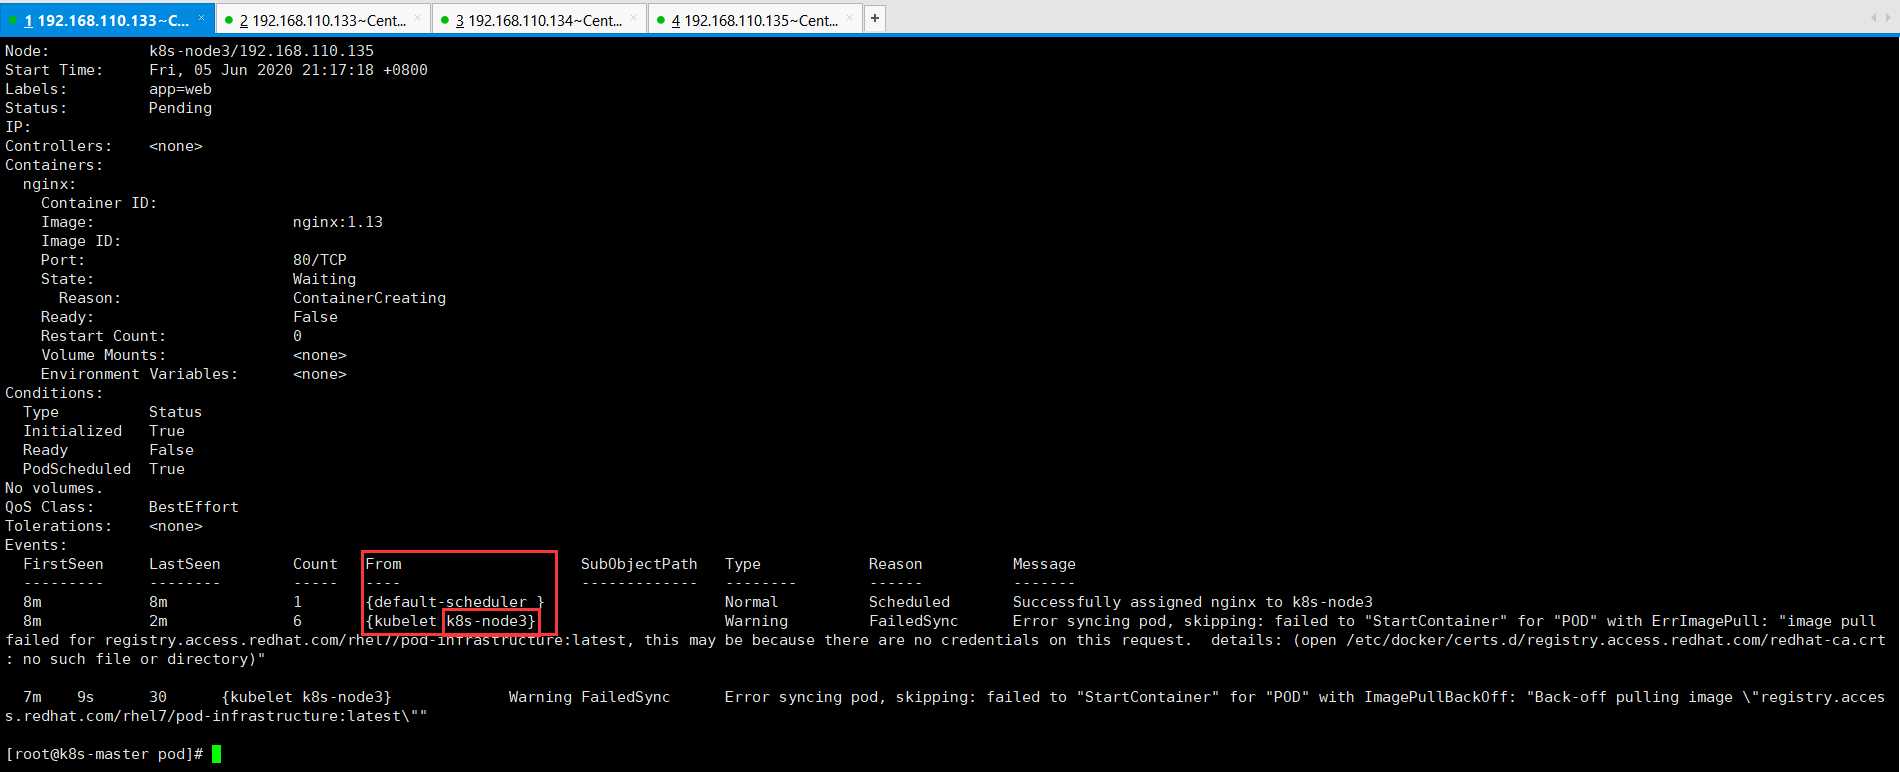
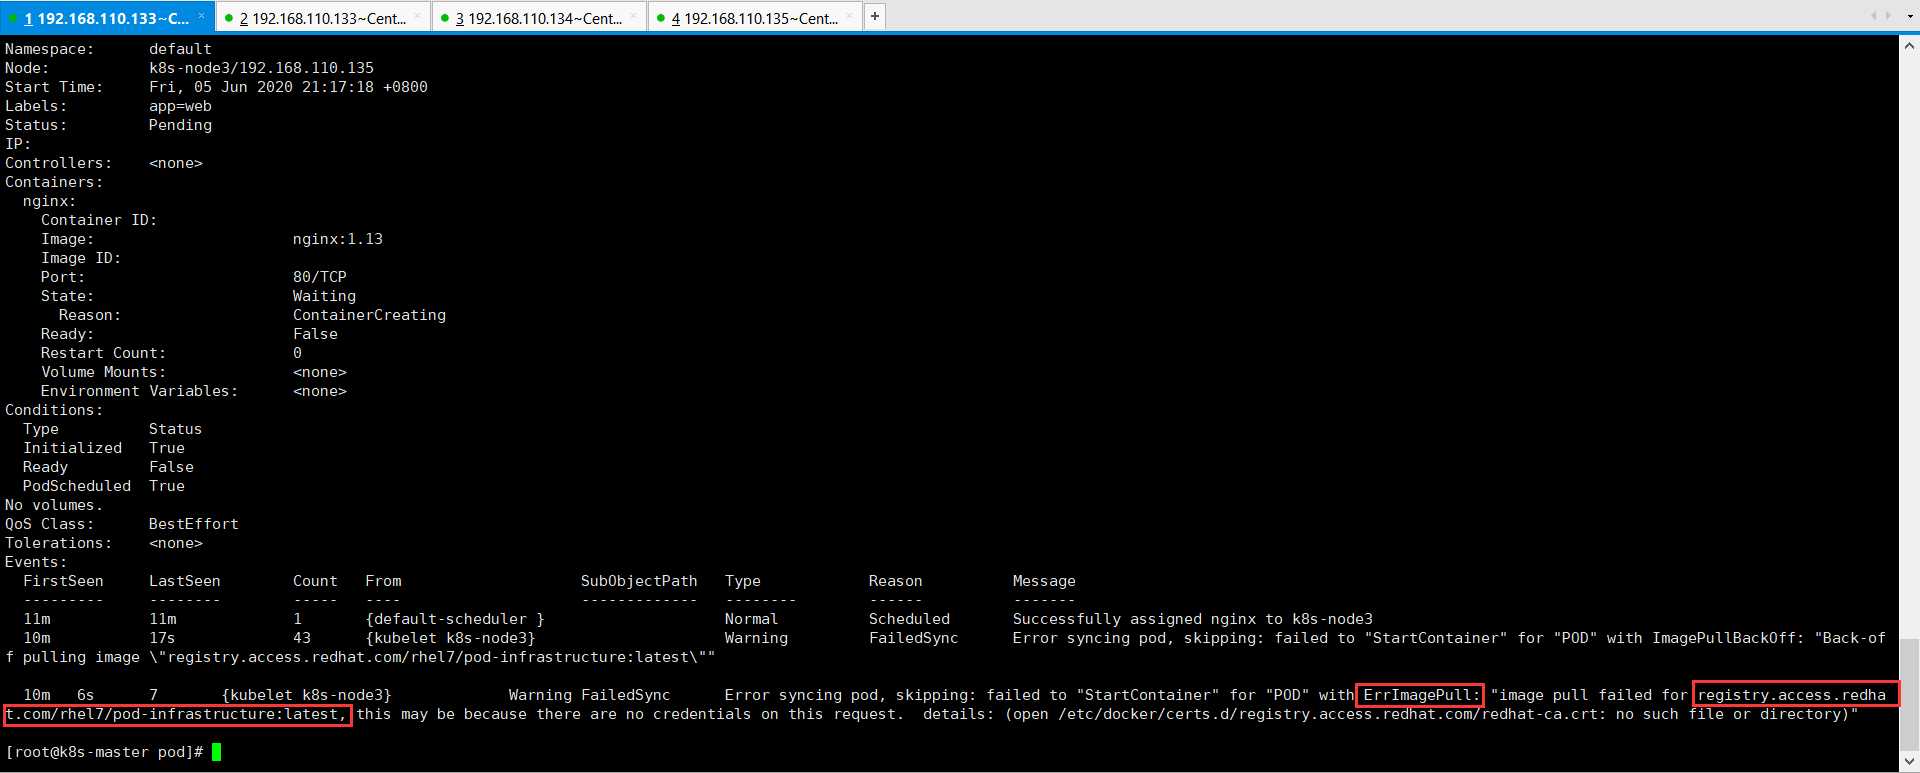
标签:second dia 单位 prevent multiple daemon confirm swift 写入 1、K8s是如何运行容器的。 答:k8s是通过定义一个Pod的资源,然后在Pod里面运行容器的。K8s最小的资源单位Pod。 2、如何创建一个Pod资源呢? 答:在K8s中,所有的资源单位都可以使用一个yaml配置文件来创建,创建Pod也可以使用yaml配置文件。 3、开始,创建一个Pod,先创建一个k8s目录,然后在k8s里面创建一个pod目录,然后创建vim nginx_pod.yaml。 配置内容,如下所示: nginx_pod.yaml的内容,如下所示: 在k8s中,所有的资源单位,只要使用配置文件声明之后,使用create -f指定nginx_pod.yaml的位置,就可以被创建了。 报错了,需要修改api-server的配置文件,需要将ServiceAccount禁用掉即可。 将ServiceAccount禁用掉即可。 由于修改了api-server的配置文件,现在需要重启api-server。 重启api-server完毕之后,再次使用命令进行创建。 现在可以查看创建了那些Pod,get命令是查看资源的列表,如下所示: 查看组件的状态。 查看node的命令,如下所示: 仔细观察这个Pod一直处于ContainerCreating状态,一直都没有1/1准备好。 可以使用命令kubectl describe pod nginx,查看具体卡在那里,如下所示: 可以看到scheduler调度到k8s-node3节点上去了。 也可以使用kubectl get pod nginx -o wide命令,查看调度到那个节点上去了。 可以看到是pull镜像的时候,就出错了。从这个地址registry.access.redhat.com/rhel7/pod-infrastructure:latest拉取的镜像。 可以看到是在k8s-node3节点pull这个镜像。在k8s-node3节点使用docker pull这个镜像报错了,报错显示没有这个文件open /etc/docker/certs.d/registry.access.redhat.com/redhat-ca.crt: no such file or directory。 但是这个证书文件是存在的,但是为什么打不开呢,因为这个证书文件是一个软链接。软链接就不存在,所以就打不开。 那么解决这个证书问题就可以解决这个问题了,但是其实并不用解决它,因为你思考一个,为什么启动一个Pod资源的时候,需要下载这么一个镜像地址呢,为什么不从别的地方下载呢,这个是由配置文件决定的。 在这个配置文件中定义的镜像地址是registry.access.redhat.com/rhel7/pod-infrastructure:latest。这个镜像地址,由于证书错误,下载不了,但是可以从其他地方进行下载。可以使用docker search搜索一下这个镜像,这个是在Docker官方仓库进行搜索的。 将镜像地址docker.io/tianyebj/pod-infrastructure复制拷贝到/etc/kubernetes/kubelet配置文件中。 由于修改了配置文件,所以要重启让其kubelet生效。 重启结束之后,再次回到Master节点上,看看它的信息描述,看看它有没有重试。 不断使用上述命令进行观察,也可以在k8s-node3节点,看看docker的临时目录,查看其有没有重试。 这个/var/lib/docker/tmp/是Docker下载的临时目录。可以看到已经超时了,换了下载镜像的地址也是超时了。 如何解决Docker的IO超时问题呢,熟悉Docker的应该知道Docker国内可以做Docker镜像的加速。加速方法,如下所示: 由于我的Docker的版本是1.13.1,其加速方法跟最新的1809/1806是不一样的。 具体操作,如下所示: 然后重启一下Docker,如下所示: 重启完Docker之后,Master主节点过段时间会再次重试。可以在主节点使用kubectl describe pod nginx命令查看,在k8s-node3节点使用命令ll -h /var/lib/docker/tmp/进行查看。 我本地是下载下来了,如果下载不下来,也可以将安装包上传到服务器。可以使用命令kubectl get pod nginx进行查看,自己的Nginx已经跑起来了。 使用Docker的导入命令,将所需的镜像导入进去。 如果刚才的未下载完毕,然后你又将镜像上传到了服务器,此时可以使用重启Docker的命令,然后去主节点Master使用命令进行查看kubectl describe pod nginx,可以看到已经识别出来了。可以使用命令kubectl get pod nginx -o wide,可以看到容器已经跑起来了。此时解决了k8s-node3可以启动这个容器。 但是,此时将这个Pod进行删除,然后再创建这个Pod。 此时,发现这个Pod调度到了k8s-node2节点了。 此时,需要修改k8s-node2的镜像地址。因为它还是会从红帽那里下载,对应本地没有的镜像还是再次pull一遍的。这样对于我们来说,启动一个容器时间很长,如果网络不稳定,这个节点上的容器就启动不起来。如果节点非常多,那么这样的情况会非常麻烦。如果Node节点很多的时候,应该使用一个私有仓库,使用私有仓库可以将已经有的镜像可以从自己的私有仓库进行下载,节省时间和网络资源。 操作,如下所示: 具体内容,如下所示: 可以先让Node节点从内网Pull镜像,如果内网没有镜像,可以先从外网进行Pull镜像,镜像Pull下来之后传到我们的私有仓库,仅需要Pull一次镜像,后来的节点直接从自己的私有仓库进行Pull镜像,极大节省时间和流量带宽。解决这个问题就是自己启用一个私有仓库。 首先搜索一下这个镜像。这个是官方的镜像。 可以直接将这个镜像pull下来,也可以进行上传。 接下来,就可以启动我们的私有仓库了。 我们的私有仓库已经起来了,可以使用docker ps命令进行查看。 此时,可以试着想这个私有仓库上传我们的镜像,如下所示: 由于我的这里报错了,这个问题可能是由于客户端采用https,docker registry未采用https服务所致。一种处理方式是把客户对地址“192.168.110.133:5000”请求改为http。解决方法:在“/etc/docker/”目录下,创建"daemon.json"文件。在文件中写入: 重启docker。问题解决: 这里,顺便将另外两台机器也配置一下,避免出现这种错误。 如果其他Node节点需要使用这个私有仓库都是需要修改Docker的配置文件的。 具体操作,如下所示: 然后需要重启Docker。 为了Node节点从私有仓库Pull镜像,还需要修改/etc/kubernetes/kubelet 然后重启kubelet。 这里将Ngnix也上传到私有仓库里面,如下所示: 此时,可以将k8s-master、k8s-node3节点的kubelet修改为从私有仓库Pull镜像。 具体操作,如下所示: 然后重启kubelet。 总结,步骤很多,但是这里需要注意的是,在三台节点上面,都需要修改docker的配置和kubelet的配置。修改完毕需要进行重启即可。 修改内容,如下所示: 修改kubelet的配置。 修改内容,如下所示: 最后需要,修改一下Pod,让其从私有仓库上Pull镜像。如下所示: 修改内容,如下所示: 看到下面两个文件的不同了吗,折腾了一大圈。睡觉去。 最后这里我测试了好几遍,由于快凌晨了,最后测试成功了,先贴一下吧。我把三台机器的docker、kubelet都重启了一遍,因为中间错了好几次,不能从私有仓库下载镜像。 由于上面将Nginx拼写成了Ngnix造成的问题,我这里将上传到私有仓库的镜像删除一下,然后将K8s创建的Nginx Pod也删除了,这里将拼写正确的上传到私有仓库,再从私有仓库下载一遍。 首先将k8s创建的Nginx Pod删除掉。1 [root@k8s-master ~]# mkdir k8s
2 [root@k8s-master ~]# cd k8s/
3 [root@k8s-master k8s]# ls
4 [root@k8s-master k8s]# mkdir pod
5 [root@k8s-master k8s]# ls
6 pod
7 [root@k8s-master k8s]# cd pod/
8 [root@k8s-master pod]# vim nginx_pod.yaml
9 [root@k8s-master pod]#
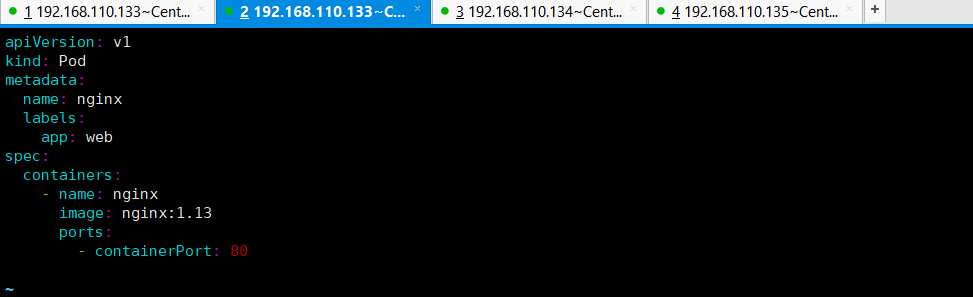
 1 # 声明api的版本。
 2 apiVersion: v1
 3 # kind代表资源的类型,资源是Pod。
 4 kind: Pod
 5 # 资源叫什么名字,是在其属性metadata里面的。
 6 metadata:
 7   # 第一个属性name的值是nginx,即Pod的名字就叫做Nginx。
 8   name: nginx
 9   # 给Pod贴上了一个标签,标签是app: web,标签是有一定的作用的。
10   labels:
11     app: web
12 # spec是详细,详细里面定义了一个容器。
13 spec:
14   # 定义一个容器,可以声明多个容器的。
15   containers:
16     # 容器的名称叫做nginx
17     - name: nginx
18       # 使用了什么镜像,可以使用官方公有的,也可以使用私有的。
19       image: nginx:1.13
20       # ports定义容器的端口。
21       ports:
22         # 容器的端口是80,如果容器有多个端口,可以在后面接着写一行即可。
23         - containerPort: 80
1 [root@k8s-master pod]# kubectl create -f nginx_pod.yaml
2 Error from server (ServerTimeout): error when creating "nginx_pod.yaml": No API token found for service account "default", retry after the token is automatically created and added to the service account
3 [root@k8s-master pod]#
1 [root@k8s-master pod]# vim /etc/kubernetes/apiserver
1 [root@k8s-master pod]# systemctl restart kube-apiserver.service
2 [root@k8s-master pod]#
1 [root@k8s-master pod]# kubectl create -f nginx_pod.yaml
2 pod "nginx" created
3 [root@k8s-master pod]#
1 [root@k8s-master pod]# kubectl get pod
2 NAME      READY     STATUS              RESTARTS   AGE
3 nginx     0/1       ContainerCreating   0          1m
4 [root@k8s-master pod]# kubectl get pod nginx
5 NAME      READY     STATUS              RESTARTS   AGE
6 nginx     0/1       ContainerCreating   0          1m
7 [root@k8s-master pod]#
1 [root@k8s-master pod]# kubectl get componentstatus
2 NAME                 STATUS    MESSAGE             ERROR
3 controller-manager   Healthy   ok
4 scheduler            Healthy   ok
5 etcd-0               Healthy   {"health":"true"}
6 [root@k8s-master pod]#
 1 [root@k8s-master pod]# kubectl get node
 2 NAME         STATUS    AGE
 3 k8s-master   Ready     22h
 4 k8s-node2    Ready     22h
 5 k8s-node3    Ready     21h
 6 [root@k8s-master pod]# kubectl get nodes
 7 NAME         STATUS    AGE
 8 k8s-master   Ready     22h
 9 k8s-node2    Ready     22h
10 k8s-node3    Ready     21h
11 [root@k8s-master pod]#
1 [root@k8s-master pod]# kubectl get pod nginx
2 NAME      READY     STATUS              RESTARTS   AGE
3 nginx     0/1       ContainerCreating   0          4m
4 [root@k8s-master pod]#
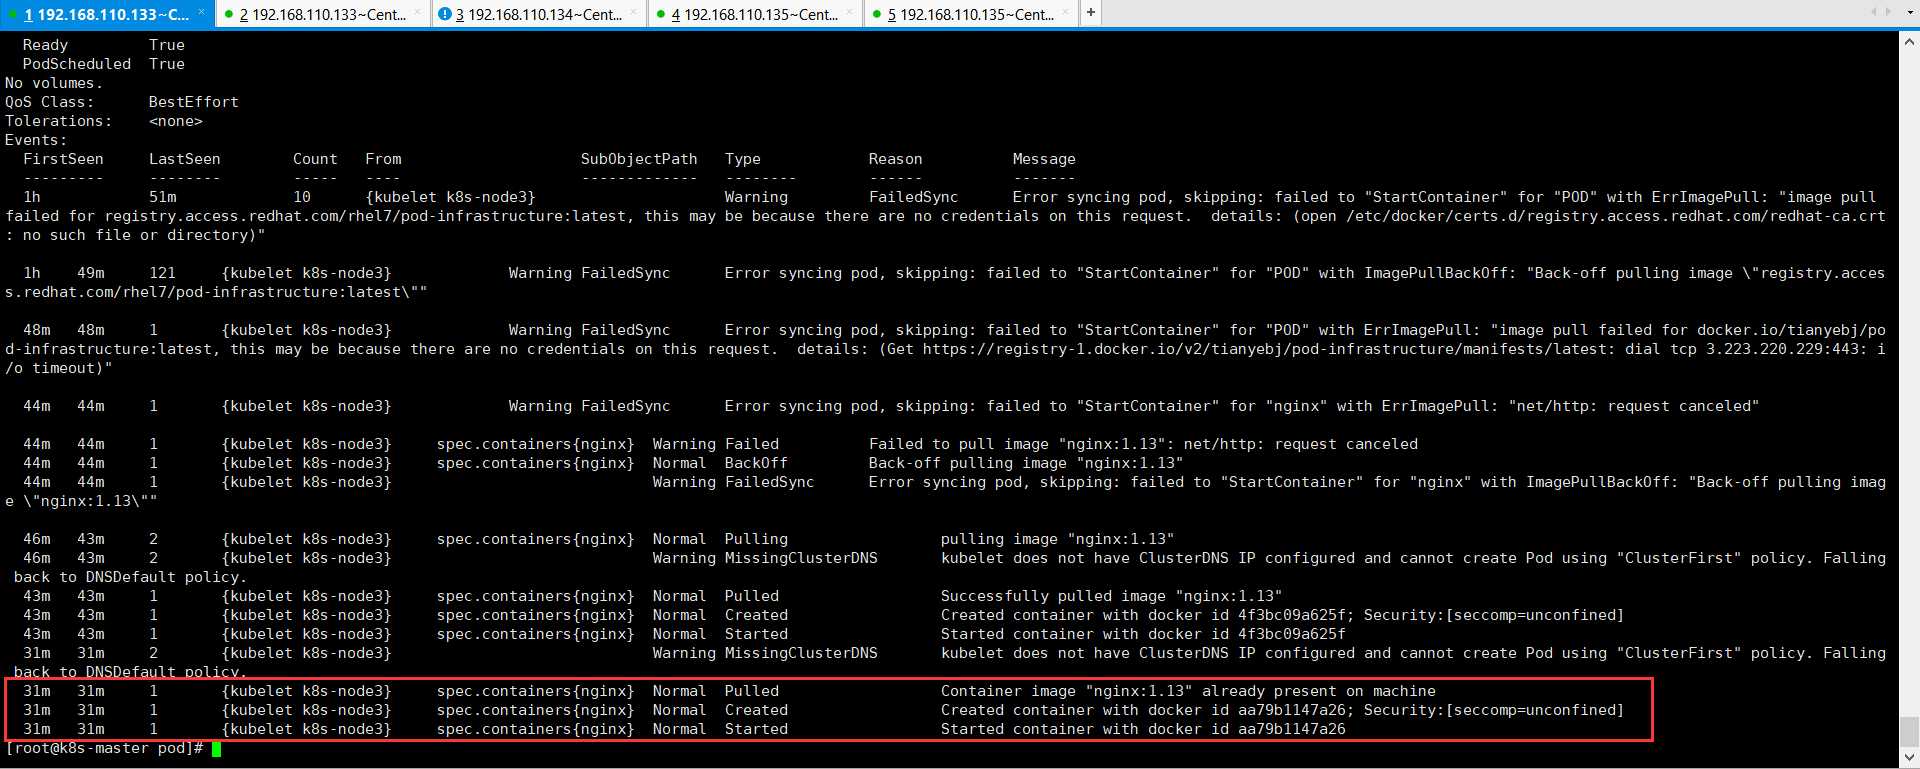
1 [root@k8s-master pod]# kubectl describe pod nginx
2 Name: nginx
3 Namespace: default
4 Node: k8s-node3/192.168.110.135
5 Start Time: Fri, 05 Jun 2020 21:17:18 +0800
6 Labels: app=web
7 Status: Pending
8 IP:
9 Controllers:
1 [root@k8s-master pod]# kubectl get pod nginx -o wide
2 NAME READY STATUS RESTARTS AGE IP NODE
3 nginx 0/1 ContainerCreating 0 10m
1 [root@k8s-node3 ~]# docker pull registry.access.redhat.com/rhel7/pod-infrastructure:latest
2 Trying to pull repository registry.access.redhat.com/rhel7/pod-infrastructure ...
3 open /etc/docker/certs.d/registry.access.redhat.com/redhat-ca.crt: no such file or directory
4 [root@k8s-node3 ~]#
1 [root@k8s-node3 ~]# ls /etc/docker/certs.d/registry.access.redhat.com/redhat-ca.crt
2 /etc/docker/certs.d/registry.access.redhat.com/redhat-ca.crt
3 [root@k8s-node3 ~]#
1 [root@k8s-node3 ~]# vim /etc/kubernetes/kubelet
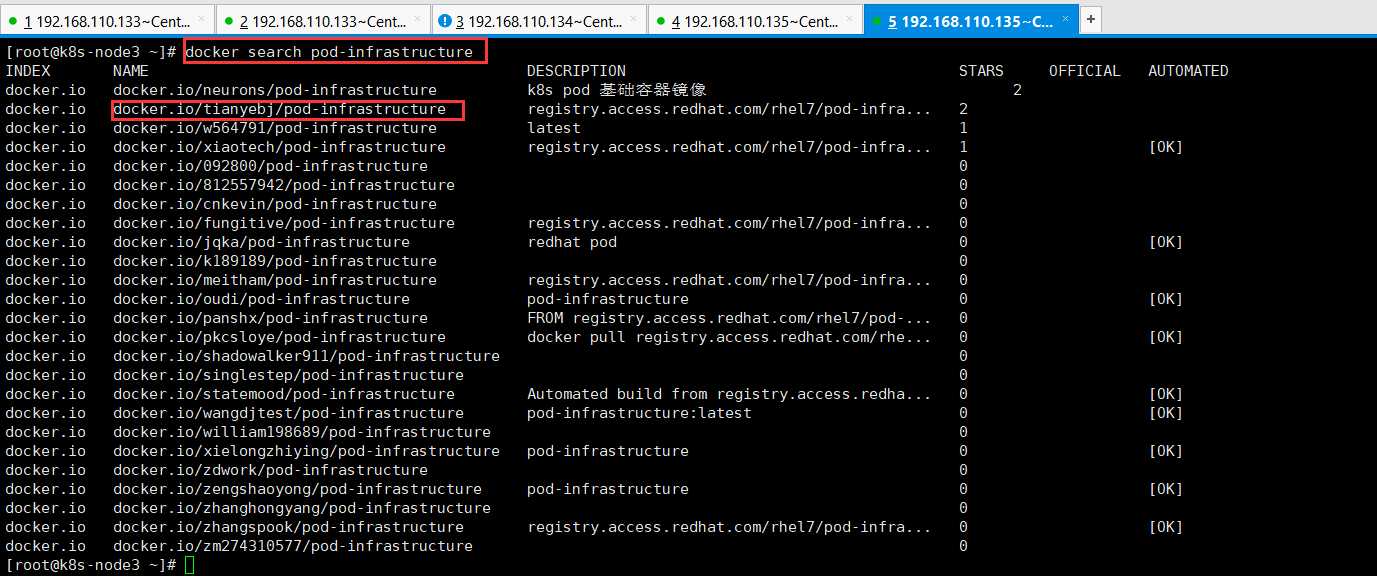
 1 [root@k8s-node3 ~]# docker search pod-infrastructure
 2 INDEX       NAME                                          DESCRIPTION                                     STARS     OFFICIAL   AUTOMATED
 3 docker.io   docker.io/neurons/pod-infrastructure          k8s pod 基础容器镜像                                  2
 4 docker.io   docker.io/tianyebj/pod-infrastructure         registry.access.redhat.com/rhel7/pod-infra...   2
 5 docker.io   docker.io/w564791/pod-infrastructure          latest                                          1
 6 docker.io   docker.io/xiaotech/pod-infrastructure         registry.access.redhat.com/rhel7/pod-infra...   1                    [OK]
 7 docker.io   docker.io/092800/pod-infrastructure                                                           0
 8 docker.io   docker.io/812557942/pod-infrastructure                                                        0
 9 docker.io   docker.io/cnkevin/pod-infrastructure                                                          0
10 docker.io   docker.io/fungitive/pod-infrastructure        registry.access.redhat.com/rhel7/pod-infra...   0
11 docker.io   docker.io/jqka/pod-infrastructure             redhat pod                                      0                    [OK]
12 docker.io   docker.io/k189189/pod-infrastructure                                                          0
13 docker.io   docker.io/meitham/pod-infrastructure          registry.access.redhat.com/rhel7/pod-infra...   0
14 docker.io   docker.io/oudi/pod-infrastructure             pod-infrastructure                              0                    [OK]
15 docker.io   docker.io/panshx/pod-infrastructure           FROM registry.access.redhat.com/rhel7/pod-...   0
16 docker.io   docker.io/pkcsloye/pod-infrastructure         docker pull registry.access.redhat.com/rhe...   0                    [OK]
17 docker.io   docker.io/shadowalker911/pod-infrastructure                                                   0
18 docker.io   docker.io/singlestep/pod-infrastructure                                                       0
19 docker.io   docker.io/statemood/pod-infrastructure        Automated build from registry.access.redha...   0                    [OK]
20 docker.io   docker.io/wangdjtest/pod-infrastructure       pod-infrastructure:latest                       0                    [OK]
21 docker.io   docker.io/william198689/pod-infrastructure                                                    0
22 docker.io   docker.io/xielongzhiying/pod-infrastructure   pod-infrastructure                              0                    [OK]
23 docker.io   docker.io/zdwork/pod-infrastructure                                                           0
24 docker.io   docker.io/zengshaoyong/pod-infrastructure     pod-infrastructure                              0                    [OK]
25 docker.io   docker.io/zhanghongyang/pod-infrastructure                                                    0
26 docker.io   docker.io/zhangspook/pod-infrastructure       registry.access.redhat.com/rhel7/pod-infra...   0                    [OK]
27 docker.io   docker.io/zm274310577/pod-infrastructure                                                      0
28 [root@k8s-node3 ~]#
1 [root@k8s-node3 ~]# systemctl restart kubelet.service
2 [root@k8s-node3 ~]#
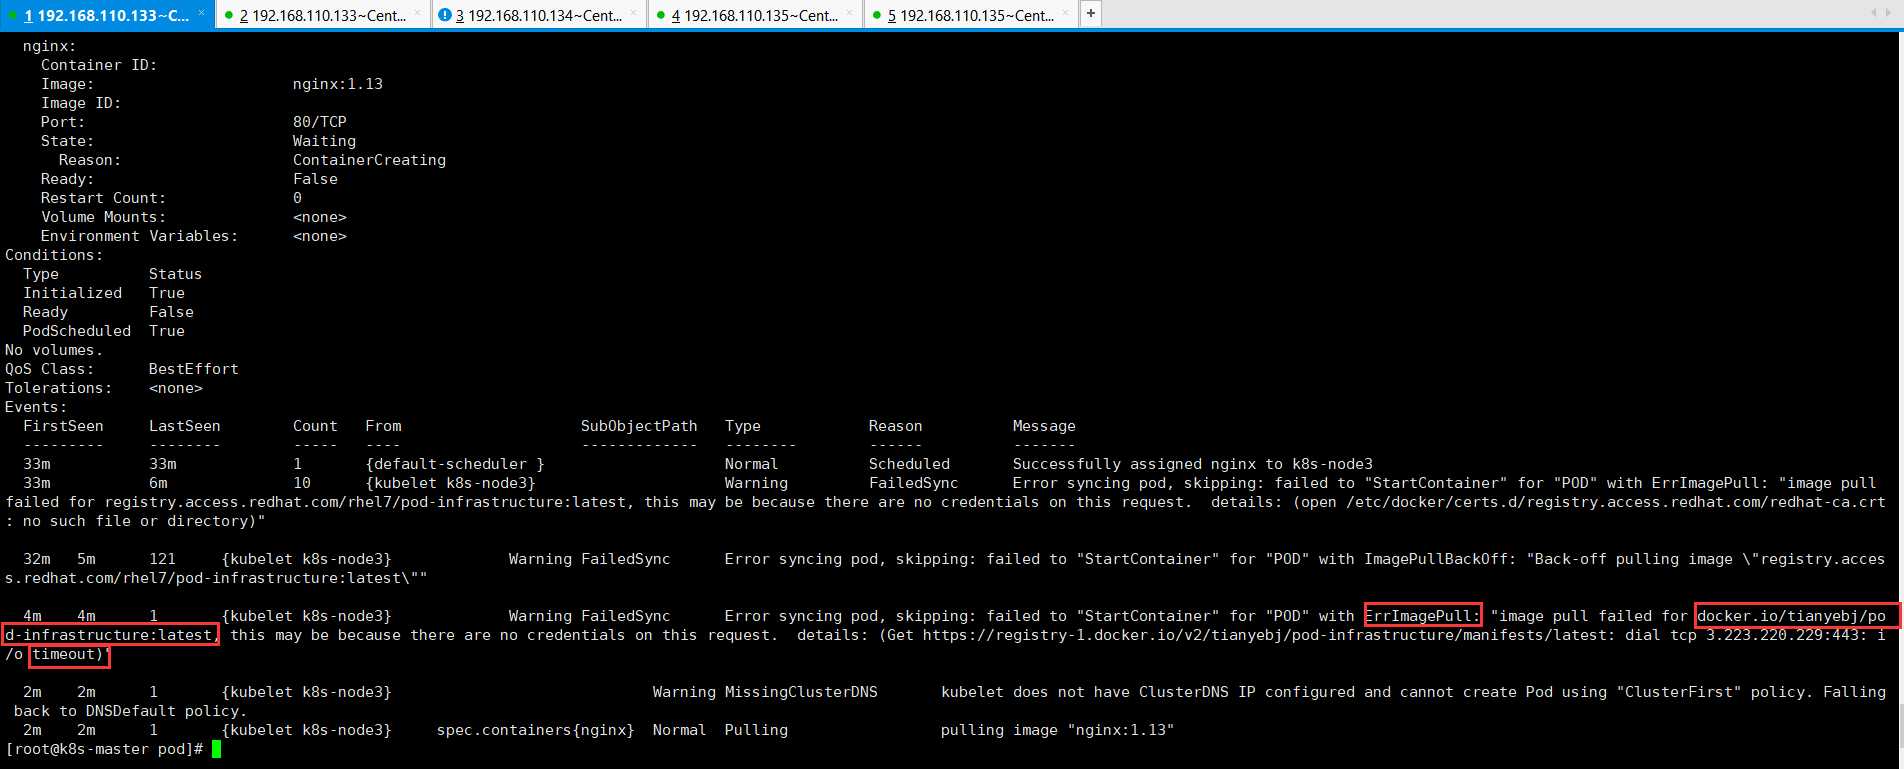
1 [root@k8s-master pod]# kubectl describe pod nginx
 1 [root@k8s-node3 ~]# ls /var/lib/docker/tmp/
 2 GetImageBlob232005897  GetImageBlob649330130  GetImageBlob688223444
 3 [root@k8s-node3 ~]# ls /var/lib/docker/tmp/
 4 GetImageBlob232005897  GetImageBlob649330130  GetImageBlob688223444
 5 [root@k8s-node3 ~]# ls /var/lib/docker/tmp/
 6 GetImageBlob232005897  GetImageBlob649330130  GetImageBlob688223444
 7 [root@k8s-node3 ~]# ll /var/lib/docker/tmp/
 8 total 16324
 9 -rw-------. 1 root root 9750959 Jun  5 21:49 GetImageBlob649330130
10 -rw-------. 1 root root     201 Jun  5 21:48 GetImageBlob688223444
11 [root@k8s-node3 ~]#
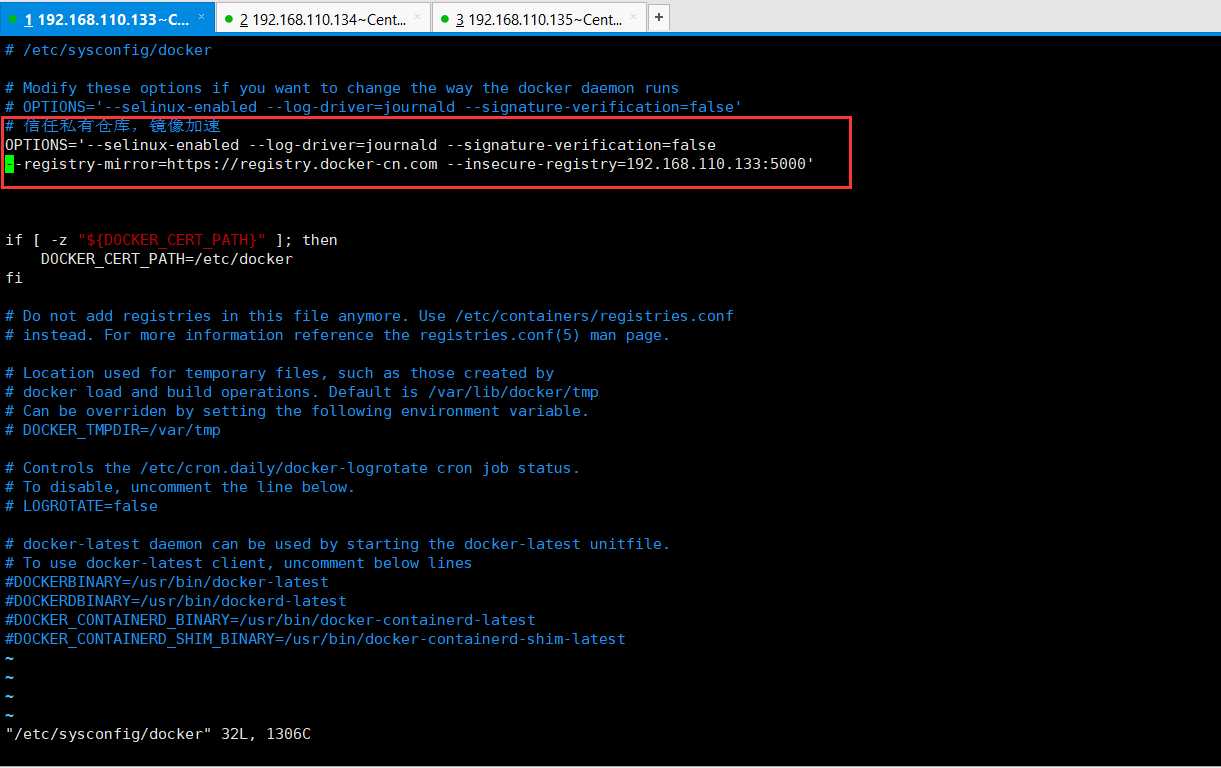
1 [root@k8s-node3 ~]# vim /etc/sysconfig/docker
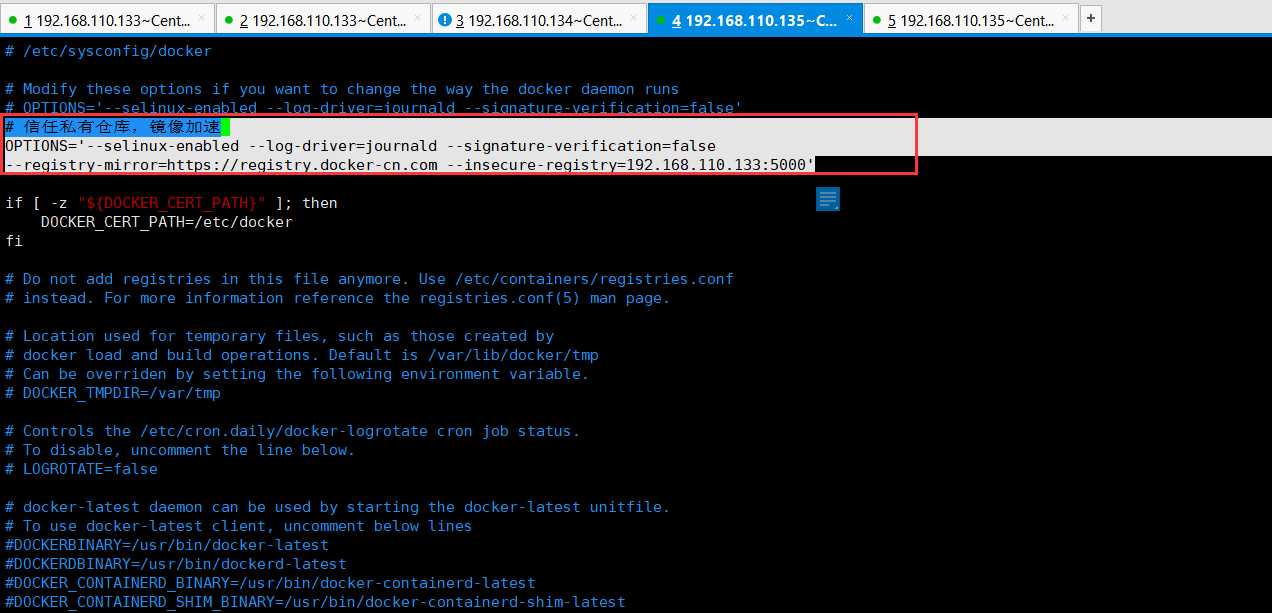
1 # 信任私有仓库,镜像加速
2 OPTIONS=‘--selinux-enabled --log-driver=journald --signature-verification=false
3 --registry-mirror=https://registry.docker-cn.com --insecure-registry=192.168.110.133:5000‘
1 [root@k8s-node3 ~]# systemctl restart docker
2 [root@k8s-node3 ~]#

1 [root@k8s-node3 ~]# docker load -i pod-infrastructure-latest.tar.gz
1 [root@k8s-node3 ~]# docker load -i docker_nginx1.13.tar.gz
1 [root@k8s-master pod]# kubectl get pod nginx -o wide
2 NAME      READY     STATUS    RESTARTS   AGE       IP            NODE
3 nginx     1/1       Running   1          1h        172.16.13.2   k8s-node3
4 [root@k8s-master pod]#
1 [root@k8s-master pod]# kubectl delete pod nginx
2 pod "nginx" deleted
3 [root@k8s-master pod]# kubectl get pod nginx -o wide
4 Error from server (NotFound): pods "nginx" not found
5 [root@k8s-master pod]#
1 [root@k8s-master pod]# kubectl create -f nginx_pod.yaml
2 pod "nginx" created
3 [root@k8s-master pod]# kubectl get pod nginx -o wide
4 NAME READY STATUS RESTARTS AGE IP NODE
5 nginx 0/1 ContainerCreating 0 20s
1 [root@k8s-node2 ~]# vim /etc/kubernetes/kubelet
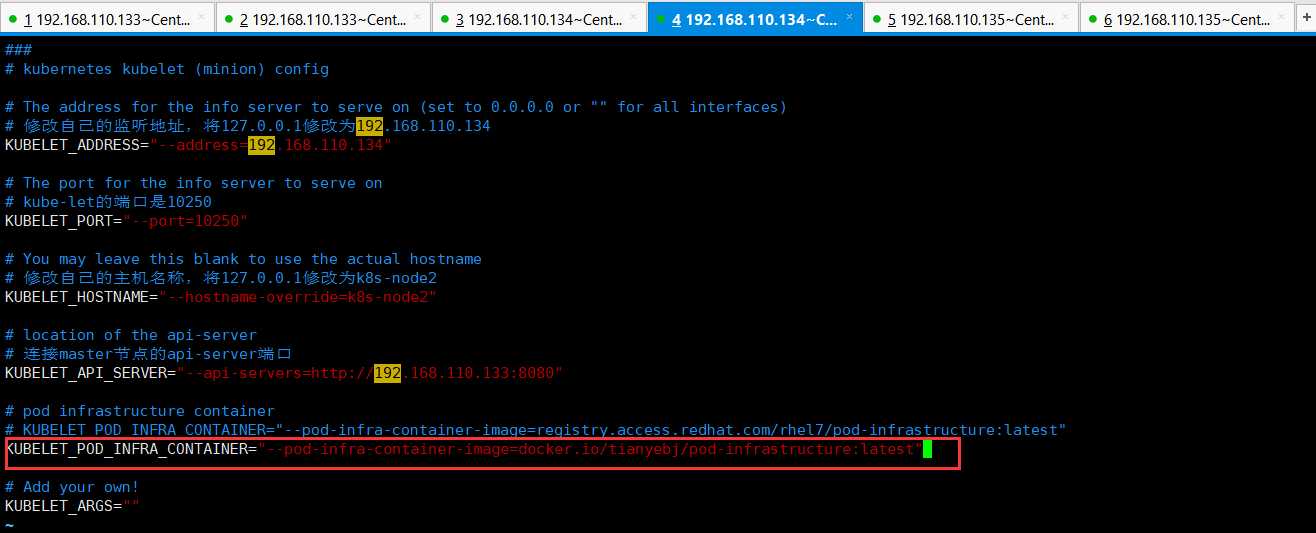
1 ###
2 # kubernetes kubelet (minion) config
3
4 # The address for the info server to serve on (set to 0.0.0.0 or "" for all interfaces)
5 # 修改自己的监听地址,将127.0.0.1修改为192.168.110.134
6 KUBELET_ADDRESS="--address=192.168.110.134"
7
8 # The port for the info server to serve on
9 # kube-let的端口是10250
10 KUBELET_PORT="--port=10250"
11
12 # You may leave this blank to use the actual hostname
13 # 修改自己的主机名称,将127.0.0.1修改为k8s-node2
14 KUBELET_HOSTNAME="--hostname-override=k8s-node2"
15
16 # location of the api-server
17 # 连接master节点的api-server端口
18 KUBELET_API_SERVER="--api-servers=http://192.168.110.133:8080"
19
20 # pod infrastructure container
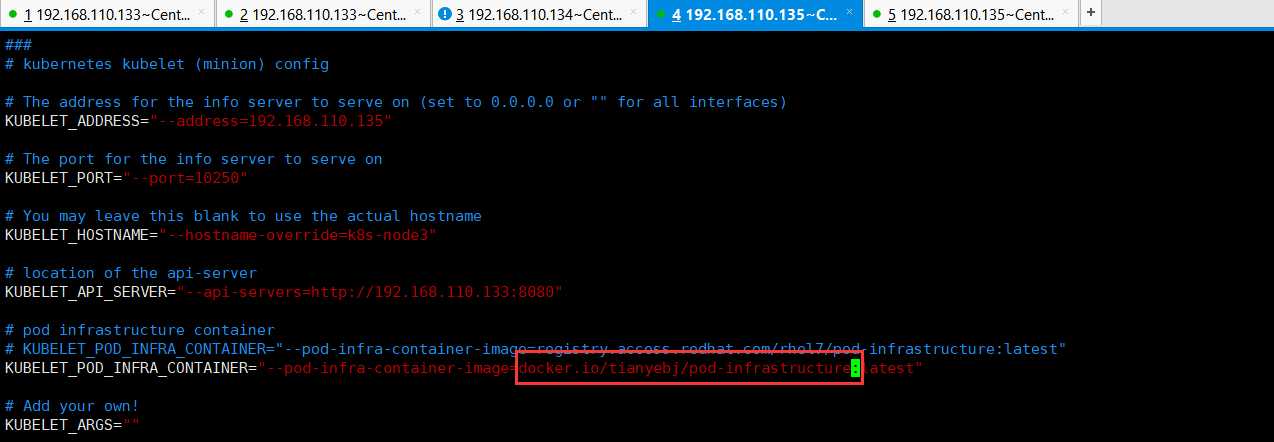
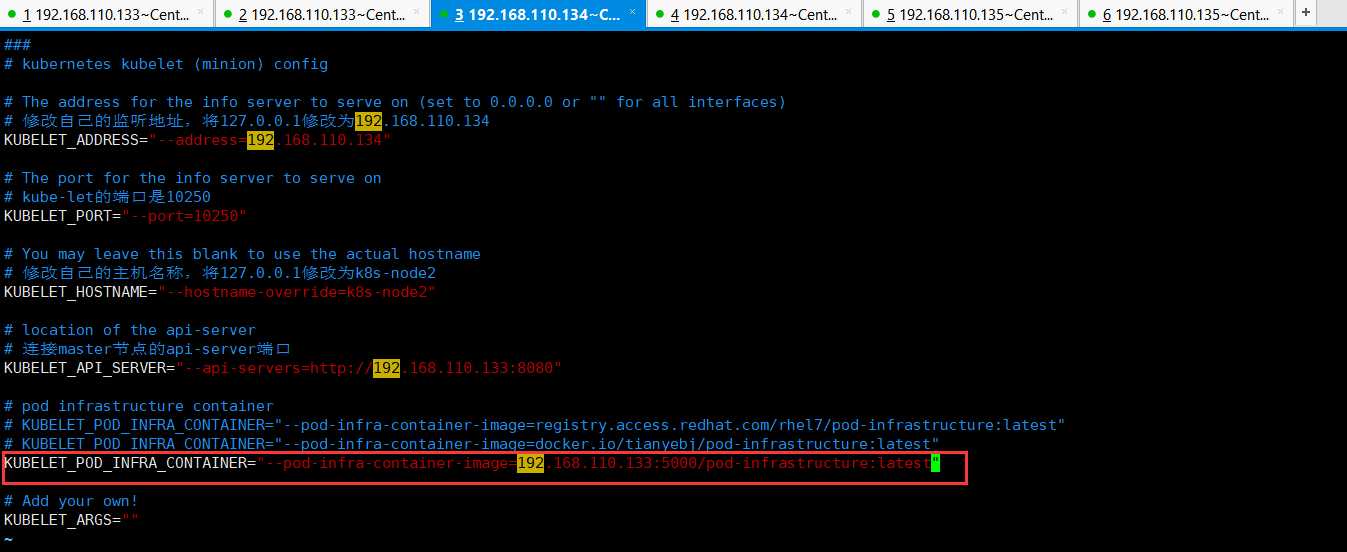
21 # KUBELET_POD_INFRA_CONTAINER="--pod-infra-container-image=registry.access.redhat.com/rhel7/pod-infrastructure:latest"
22 KUBELET_POD_INFRA_CONTAINER="--pod-infra-container-image=docker.io/tianyebj/pod-infrastructure:latest"
23
24 # Add your own!
25 KUBELET_ARGS=""
1 # 终极解决方法,自己启用自己的私有仓库。为了节约硬件配置,使用官方提供的registry私有仓库。也可以使用其他
2 docker run -d -p 5000:5000 --restart=always --name registry -v /opt/myregistry:/var/lib/registry registry
 1 [root@k8s-master pod]# docker search registry
 2 INDEX       NAME                                           DESCRIPTION                                     STARS     OFFICIAL   AUTOMATED
 3 docker.io   docker.io/registry                             The Docker Registry 2.0 implementation for...   2980      [OK]
 4 docker.io   docker.io/distribution/registry                WARNING: NOT the registry official image!!...   57                   [OK]
 5 docker.io   docker.io/stefanscherer/registry-windows       Containerized docker registry for Windows ...   31
 6 docker.io   docker.io/budry/registry-arm                   Docker registry build for Raspberry PI 2 a...   18
 7 docker.io   docker.io/deis/registry                        Docker image registry for the Deis open so...   12
 8 docker.io   docker.io/anoxis/registry-cli                  You can list and delete tags from your pri...   9                    [OK]
 9 docker.io   docker.io/jc21/registry-ui                     A nice web interface for managing your Doc...   8
10 docker.io   docker.io/vmware/registry                                                                      6
11 docker.io   docker.io/allingeek/registry                   A specialization of registry:2 configured ...   4                    [OK]
12 docker.io   docker.io/pallet/registry-swift                Add swift storage support to the official ...   4                    [OK]
13 docker.io   docker.io/arm32v6/registry                     The Docker Registry 2.0 implementation for...   3
14 docker.io   docker.io/goharbor/registry-photon                                                             2
15 docker.io   docker.io/concourse/registry-image-resource                                                    1
16 docker.io   docker.io/conjurinc/registry-oauth-server      Docker registry authn/authz server backed ...   1
17 docker.io   docker.io/ibmcom/registry                      Docker Image for IBM Cloud private-CE (Com...   1
18 docker.io   docker.io/metadata/registry                    Metadata Registry is a tool which helps yo...   1                    [OK]
19 docker.io   docker.io/webhippie/registry                   Docker images for Registry                      1                    [OK]
20 docker.io   docker.io/convox/registry                                                                      0
21 docker.io   docker.io/deepsecurity/registryviews           Deep Security Smart Check                       0
22 docker.io   docker.io/dwpdigital/registry-image-resource   Concourse resource type                         0
23 docker.io   docker.io/gisjedi/registry-proxy               Reverse proxy of registry mirror image gis...   0
24 docker.io   docker.io/kontena/registry                     Kontena Registry                                0
25 docker.io   docker.io/lorieri/registry-ceph                Ceph Rados Gateway (and any other S3 compa...   0
26 docker.io   docker.io/pivnet/registry-gcloud-image                                                         0
27 docker.io   docker.io/upmcenterprises/registry-creds                                                       0
28 [root@k8s-master pod]#
 1 [root@k8s-master pod]# docker pull docker.io/registry
 2 Using default tag: latest
 3 Trying to pull repository docker.io/library/registry ...
 4 latest: Pulling from docker.io/library/registry
 5 486039affc0a: Pull complete
 6 ba51a3b098e6: Pull complete
 7 8bb4c43d6c8e: Pull complete
 8 6f5f453e5f2d: Pull complete
 9 42bc10b72f42: Pull complete
10 Digest: sha256:7d081088e4bfd632a88e3f3bcd9e007ef44a796fddfe3261407a3f9f04abe1e7
11 Status: Downloaded newer image for docker.io/registry:latest
12 [root@k8s-master pod]#
1 [root@k8s-master pod]# docker run -d -p 5000:5000 --restart=always --name registry -v /opt/myregistry:/var/lib/registry registry
2 a27987d97039c8596ad2a2150cee9e3fbe7580c8131e9f258aea8a922c22a237
3 [root@k8s-master pod]#
1 [root@k8s-master pod]# docker ps
2 CONTAINER ID        IMAGE               COMMAND                  CREATED             STATUS              PORTS                    NAMES
3 a27987d97039        registry            "/entrypoint.sh /e..."   39 seconds ago      Up 37 seconds       0.0.0.0:5000->5000/tcp   registry
4 6d459781a3e5        busybox             "sh"                     10 hours ago        Up 10 hours                                  gracious_nightingale
5 [root@k8s-master pod]#
 1 [root@k8s-node3 ~]# docker images
 2 REPOSITORY                              TAG                 IMAGE ID            CREATED             SIZE
 3 docker.io/busybox                       latest              1c35c4412082        2 days ago          1.22 MB
 4 docker.io/nginx                         1.13                ae513a47849c        2 years ago         109 MB
 5 docker.io/tianyebj/pod-infrastructure   latest              34d3450d733b        3 years ago         205 MB
 6 [root@k8s-node3 ~]# docker tag docker.io/tianyebj/pod-infrastructure:latest 192.168.110.133:5000/pod-infrastructure:latest
 7 [root@k8s-node3 ~]# docker push 192.168.110.133:5000/pod-infrastructure
 8 The push refers to a repository [192.168.110.133:5000/pod-infrastructure]
 9 Get https://192.168.110.133:5000/v1/_ping: http: server gave HTTP response to HTTPS client
10 [root@k8s-node3 ~]#
1 [root@k8s-node3 ~]# cd /etc/docker/
2 [root@k8s-node3 docker]# echo ‘{ "insecure-registries":["192.168.110.133:5000"] }‘ > /etc/docker/daemon.json
3 [root@k8s-node3 docker]#
1 [root@k8s-node3 docker]# systemctl restart docker
2 [root@k8s-node3 docker]# docker tag docker.io/tianyebj/pod-infrastructure:latest 192.168.110.133:5000/pod-infrastructure:latest
3 [root@k8s-node3 docker]# docker push 192.168.110.133:5000/pod-infrastructure:latest
4 The push refers to a repository [192.168.110.133:5000/pod-infrastructure]
5 ba3d4cbbb261: Pushed
6 0a081b45cb84: Pushed
7 df9d2808b9a9: Pushed
8 latest: digest: sha256:a378b2d7a92231ffb07fdd9dbd2a52c3c439f19c8d675a0d8d9ab74950b15a1b size: 948
9 [root@k8s-node3 docker]#
1 [root@k8s-master pod]# echo ‘{ "insecure-registries":["192.168.110.133:5000"] }‘ > /etc/docker/daemon.json
1 [root@k8s-node2 ~]# echo ‘{ "insecure-registries":["192.168.110.133:5000"] }‘ > /etc/docker/daemon.json
1 [root@k8s-node2 ~]# vim /etc/sysconfig/docker
1 OPTIONS=‘--selinux-enabled --log-driver=journald --signature-verification=false
2 --registry-mirror=https://registry.docker-cn.com --insecure-registry=192.168.110.133:5000‘

1 [root@k8s-node2 ~]# systemctl restart docker
1 [root@k8s-node2 ~]# vim /etc/kubernetes/kubelet
1 [root@k8s-node2 ~]# systemctl restart kubelet.service
2 [root@k8s-node2 ~]#
1 [root@k8s-node3 docker]# docker tag docker.io/nginx:1.13 192.168.110.133:5000/ngnix:1.13
2 [root@k8s-node3 docker]# docker push 192.168.110.133:5000/ngnix:1.13
3 The push refers to a repository [192.168.110.133:5000/ngnix]
4 7ab428981537: Pushed
5 82b81d779f83: Pushed
6 d626a8ad97a1: Pushed
7 1.13: digest: sha256:e4f0474a75c510f40b37b6b7dc2516241ffa8bde5a442bde3d372c9519c84d90 size: 948
8 [root@k8s-node3 docker]#
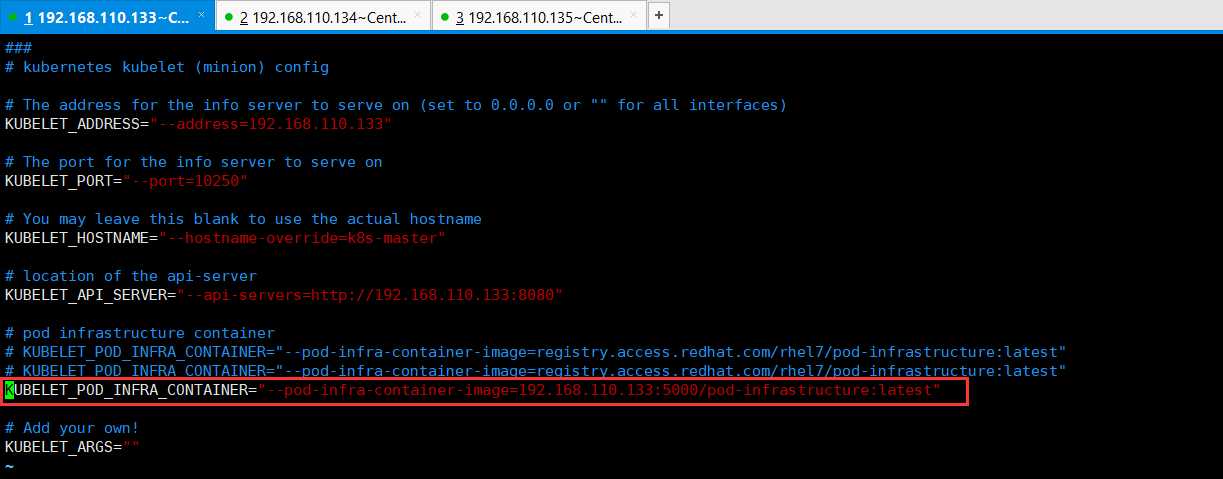
1 [root@k8s-node3 docker]# vim /etc/kubernetes/kubelet
1 [root@k8s-master pod]# vim /etc/kubernetes/kubelet
1 [root@k8s-node3 docker]# systemctl restart kubelet.service
2 [root@k8s-node3 docker]#
1 [root@k8s-master pod]# systemctl restart kubelet.service
2 [root@k8s-master pod]#
1 [root@k8s-master pod]# vim /etc/sysconfig/docker
2 [root@k8s-master pod]# systemctl restart docker
1 # 信任私有仓库,镜像加速
2 OPTIONS=‘--selinux-enabled --log-driver=journald --signature-verification=false
3 --registry-mirror=https://registry.docker-cn.com --insecure-registry=192.168.110.133:5000‘
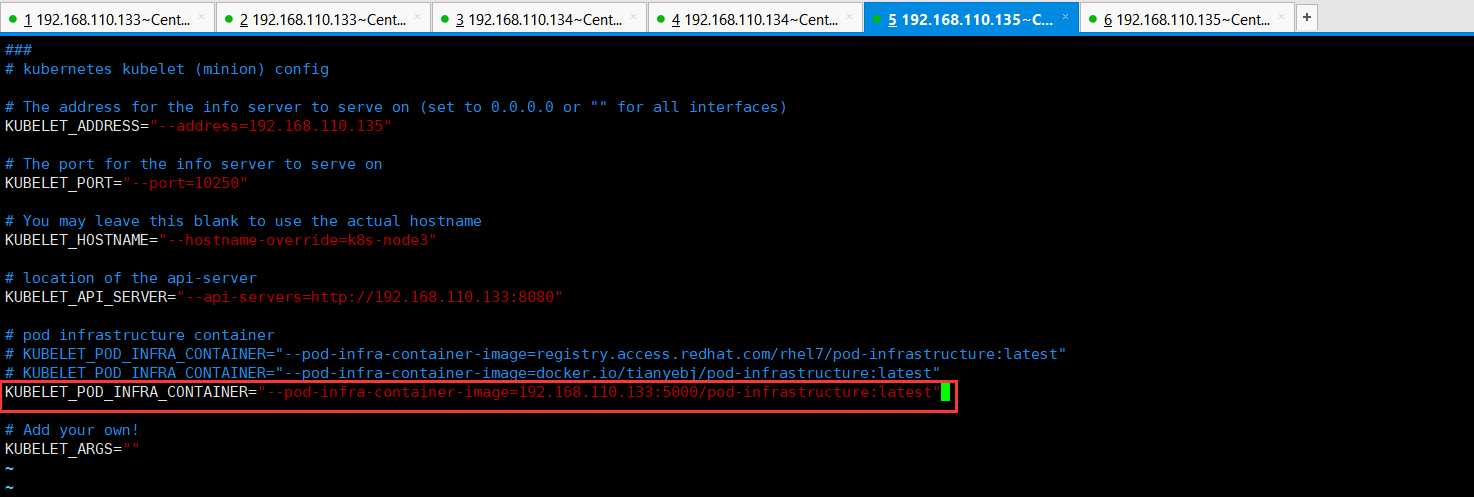
1 [root@k8s-master pod]# vim /etc/kubernetes/kubelet
2 [root@k8s-master pod]# systemctl restart kubelet.service
1 KUBELET_POD_INFRA_CONTAINER="--pod-infra-container-image=192.168.110.133:5000/pod-infrastructure:latest"
 1 apiVersion: v1
 2 kind: Pod
 3 metadata:
 4   name: nginx
 5   labels:
 6     app: web
 7 spec:
 8   containers:
 9     - name: nginx
10       image: 192.168.110.133:5000/nginx:1.13
11       ports:
12         - containerPort: 80
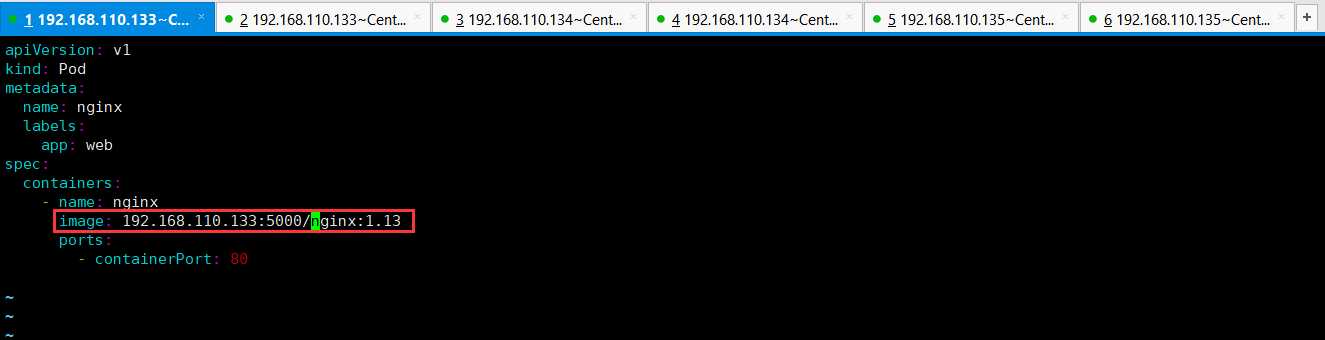
 1 apiVersion: v1
 2 kind: Pod
 3 metadata:
 4   name: nginx
 5   labels:
 6     app: web
 7 spec:
 8   containers:
 9     - name: nginx
10       image: 192.168.110.133:5000/ngnix:1.13
11       ports:
12         - containerPort: 80
1 [root@k8s-master pod]# vim nginx_pod.yaml
2 [root@k8s-master pod]# kubectl delete pod nginx
3 pod "nginx" deleted
4 [root@k8s-master pod]# kubectl describe pod nginx
5 Error from server (NotFound): pods "nginx" not found
6 [root@k8s-master pod]# kubectl create -f nginx_pod.yaml
7 pod "nginx" created
8 [root@k8s-master pod]# kubectl describe pod nginx
9 Name: nginx
10 Namespace: default
11 Node: k8s-master/192.168.110.133
12 Start Time: Fri, 05 Jun 2020 23:55:23 +0800
13 Labels: app=web
14 Status: Pending
15 IP:
16 Controllers:
文章标题:Kubernetes(k8s)常用资源的使用、Pod的常用操作
文章链接:http://soscw.com/index.php/essay/49831.html